
The All Down Strums Exercise on Guitar
In this video we're learning the most simple strumming pattern on guitar!

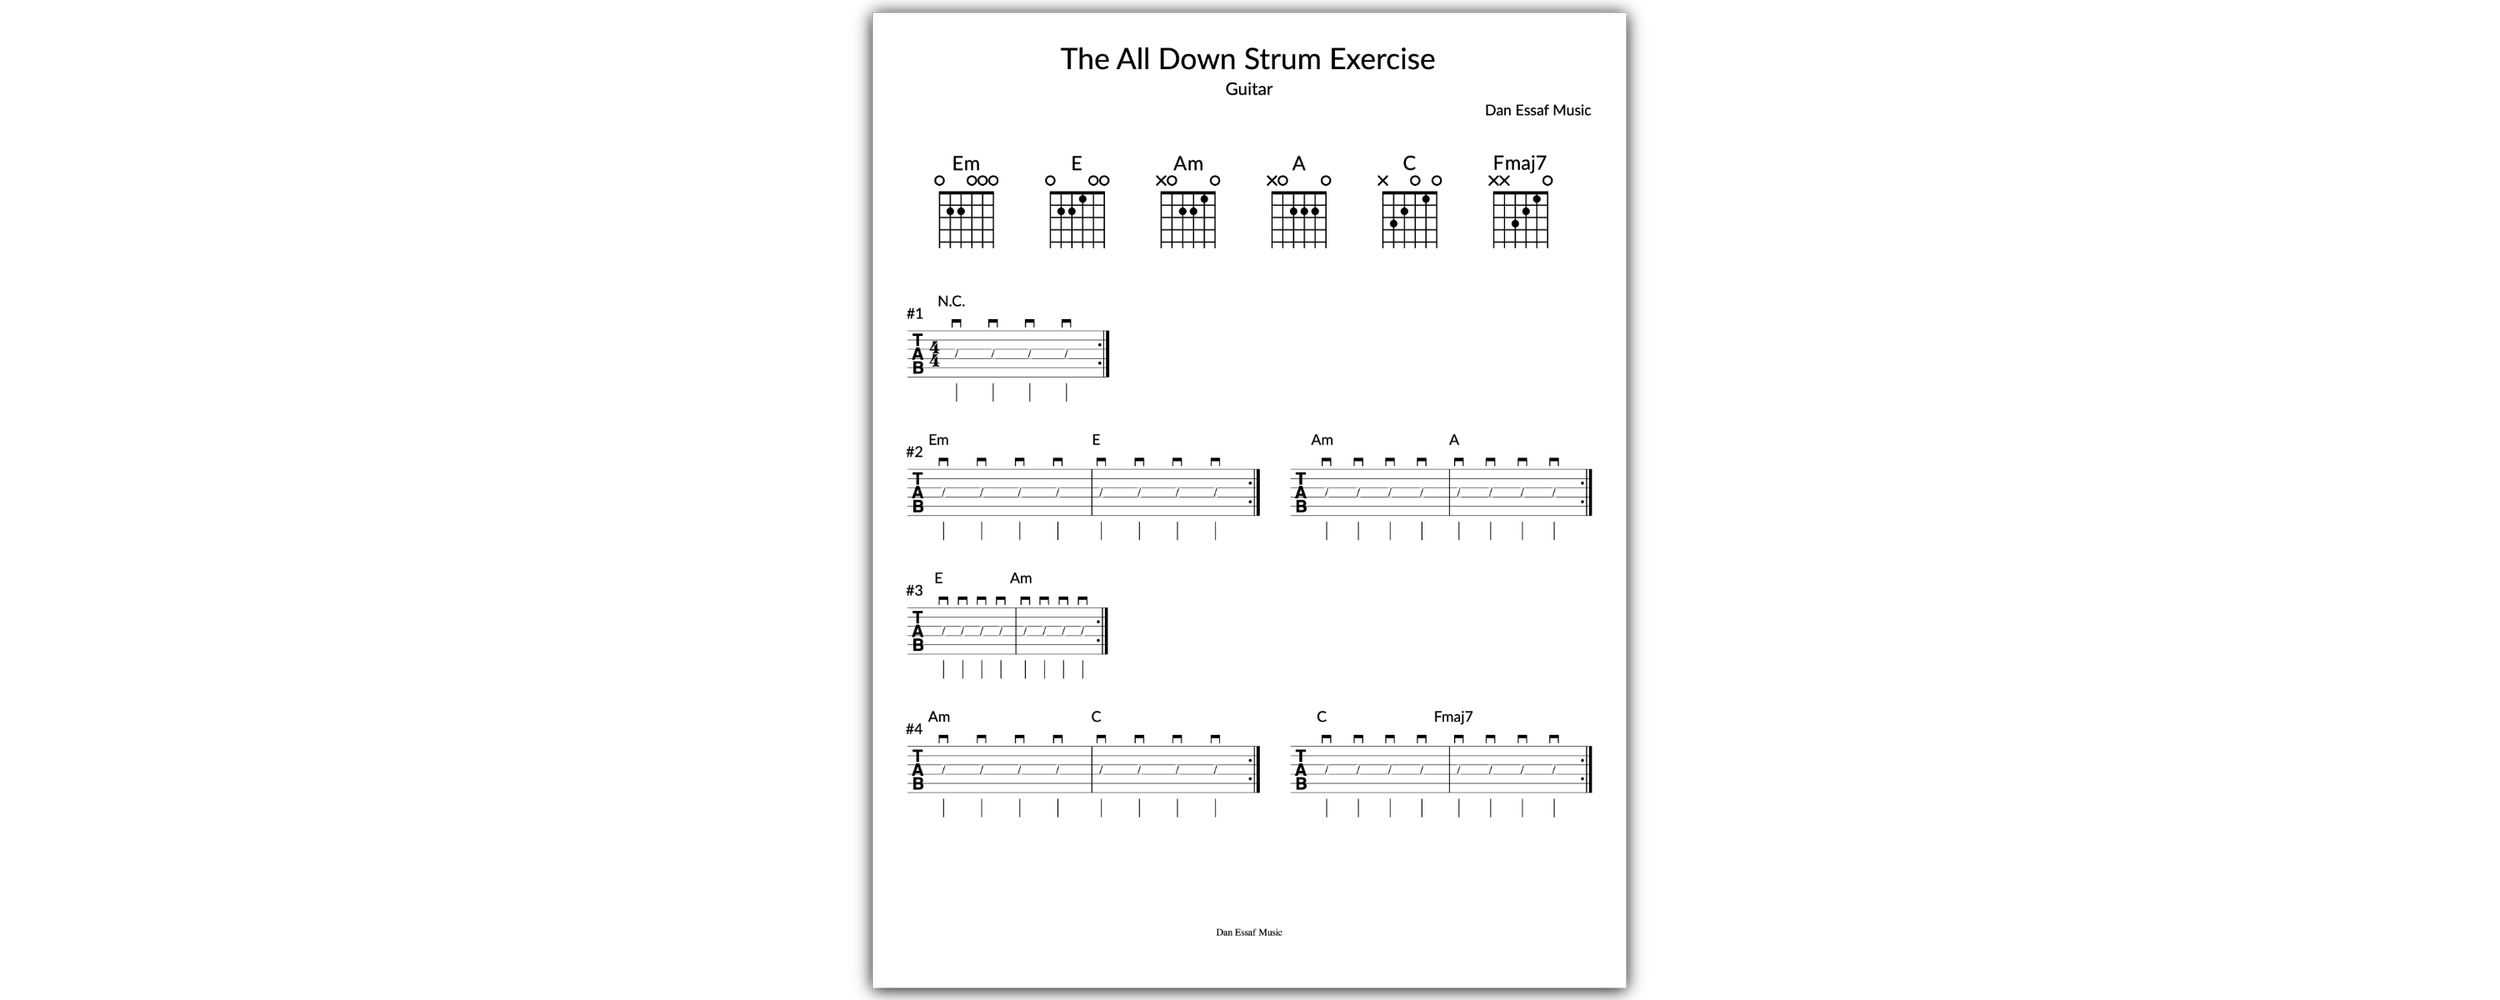
In this video we're learning the all down strums exercise on guitar! It’s one of the easiest places to start with learning guitar!
Back to the Exercise Videos Page
Have a more detailed question? Send it directly to me here and get a video response back by email!


Some links on this page are affiliate links that I earn a small commission on when you make a purchase at no additional cost to you.
Transcription
Today we're going to cover the all down strum pattern, which is just exactly how it sounds. Just all downs and it's probably the easiest strum pattern out there. So the first thing we want to do is we want to practice getting comfortable with the motion itself. So instead of playing some chords, we're going to mute the strings by just resting our fretting hand on the guitar there. And then we're going to practice getting our pick gliding through the strings a little bit quickly. And we want to practice that motion back and forth. So we don't want to have a tiny strum. We want to have this bigger strum to give our arm some momentum when it comes to strumming. And that's really going to help with our rhythm down the road. If you're new to strumming, make sure you spend plenty of time just getting used to this motion and  making sure you're not keeping it this little… Or anything like that. Keep it big and swing back and forth. Once that's comfortable, then we're going to move on to chord changes. And we start with some easy ones. A couple of easy ones to start with are E minor and E major. As well as A minor and A major. So let's take a look at E minor and E major first. So we're going to start by looking at the E minor chord. With the E minor chord, I'm going to use my second and third finger on the A and the D strings 2nd fret, and I'm going to strum four times. And then I'm going to put my first finger down on the first fret G string. That's going to change it to E major. And then, I’m just gonna strum four times again. Now my goal here is to switch back and forth, keeping these two fingers down while lifting my first finger up and down every four strums. Just to keep it simple if your new to strumming. 1 2 3 4 You're probably never going to see E minor and E major together in a song, or at least it's going to be extremely rare. But it’s still getting used to that multitasking of strumming while changing chords at the same time. And this is a very easy one. It's very similar to A minor and A major, which is what you want to do next. Now A minor is the same shape as the E major, just down one string. So it's still that second finger, third finger, first finger, going second fret, second fret, first fret. But now we're going D string, G string, B string. And going A minor to A major what we can do is just put our pinky down on the second fret B string. And it's optional to lift your first finger or not, or you can just keep it down. And we want to do the same thing. Strum four times A minor, strum four times A major. That way we're really only moving one finger up and down. Now if you're a beginner, you're going to see a lot of TABs that say mute that E string on the top for the A minor and A major chords. And it's not totally necessary because E is in the chord. You're just doing what's called an inversion. So it's not going to sound terrible for either chord. But as you get better, you're going to want to practice muting that string with your thumb. The next chord progression I would practice when it comes to just doing all down strumming and practicing changing chords while strumming is E major and A minor. Same chord shape, just different strings. Now we're no longer keeping fingers down the whole time, and that's what makes it a little bit more difficult. So what we want to do here is first just practice those fingers going back and forth. And when you're comfortable with it, just do a few strums and don't worry about timing. Making sure it sounds nice and clean. When you're ready, then you try to do it in rhythm, keeping everything in time. So what we want to do is when we hit the fourth strum… 1 2 3 4  We want to try to hold that chord until we’re up here and we're coming back down. And the change is at the same time as that pick swinging back towards the strings. Because if we lift it too early, we're going to end up muting the strings. It's not going to sound super great. We're going to cut the sound short. So you're probably going to have to practice this one pretty slowly if you're new to guitar. Just remember it takes time, practice, but you will get there. So if we do it really slowly… 1 2 3 4 When you’ve gotten the E major and the A minor chord transition pretty well then we're going to move on to A minor and C major because they're pretty similar. If we're back to A minor, 2nd fret, 2nd fret, 1st fret we're going to keep our first and second finger  in the same place and we're going to move our ring finger up to the 3rd fret A string and  stretch those two out a little bit. Now just like with the A's, if you're a beginner, or if this is your first time making C major, you can have this open string of the E because E is in the chord. Again, that's an inversion C/E, but it's not going to sound terrible. But as you get better and more comfortable, you're going to want to wrap your thumb around and mute that string. First, we just want to take it slow, making sure we have the chords nice and clean. Without any regards to rhythm or anything. Then when you're ready, move on to try to do that same slow strum and keeping your rhythm while switching chords. And just like the other chords you go back and forth, back and forth. Another easier chord progression that you can practice with the all down strums is the C major to the F major 7. Now with the F major 7, we're basically keeping our first finger on that B string for C major. And we're going to take our second and third finger and we're just going to move them each down one string. The difference here is we do want to have the top two strings muted, which is pretty difficult for a beginner. But just like everything else we've done so far, you can have those strings open. It's going to sound a little different. Again, the E and the A both are in the  F major 7 chord, so it does create another inversion. But just like the C, the A, the A minor, you want to slowly practice wrapping your thumb around those top two strings until it's a little more comfortable. And you get that F major 7 sound. First, you practice the going back and forth… And then you practice the strumming just like before… Going back and forth, back and forth,  C, F major 7, C, F major 7. After you've mastered switching those easier combinations,  try switching any chords you know, like G and A minor. Just get used to switching any combinations you can think of. And that way any song you come across, you've already done that combination hopefully. Just remember that whatever chord you're holding, hold it until that down swing and then switch it so that you get a nice long sustain out of it. And everything kind of flows together. If you're really having trouble with it, slow down. Slow is good because slow we can hear if we sound good or not. If you're going fast and you sound muddy, it's going to be harder to fix. A couple of good songs that work with the all down strum pattern are Let it Be and All You Need is Love both by The Beatles. With just a bit of practice, you're going to get it. It might take a week, it might take a month. As long as you're keeping it in a good routine and putting it into practice every day, you're going to get it eventually. Just keep that arm moving and don't do those little… If you like the video, please give it a like! If you want to see more guitar videos, please subscribe! Just remember to have fun, Happy Practicing!